Blogging my way through wedding planning, crafts, life and all the unexpected events in between.

Thursday, March 31, 2011

The Color Scheme

Weddings are defined more by color now, than the while dress the bride wears.  I was not necessarily a bride that knew right away what color scheme I wanted.  I wavered back and forth for a while between wanting traditional fall colors - bright yellow, dark orange, hunter greens, splashes of red and purple for the pop of color.  Like this wedding below:

My Favorite colors are purple and blue (odd combo I know).  But I am also a girl who loves her pink.  So I realized I was cheating my self by basing the wedding colors off of just traditional fall aspects.  I also wanted to incorporate the beach into the colors to help everything flow.  I began looking for inspiration:


                                                           Teal and Pink....almost


                                                     Teal and Tangerine... too Miami Dolphins


                                                           Very close, but no purple...

                                                                Juuuuuust about right but not exactly....

It seems the best I can do for my color inspiration is show you just how ahead of the fashion and trends I can really be.  I picked our color scheme (back in September of 2010) because it was what I liked best, it related to the beach, and it made me truly happy inside thinking of all the wonderful things that come in the colors.  I love the world of fashion and Pantone (a leading color company) puts out a report of the top color trends from the runways at fashion week.  The colors they are reporting are "hot and new" for 2011:

                                            Dark Teal, Phlox, Cedar and Nougat - or sand as I call it.

I know that honeysuckle is the color of the year, but from phlox on over - I'm in loooooove.  Perfect for the feel and look of our wedding.  Natural, but bold, elegant but still fun.  So excited!

Did you have any trouble deciding on your color scheme?  Was it easy to find inspiration?

Tuesday, March 29, 2011

Peeps Part Two!

Ok, I was so inspired to make the Bunny Peeps from Dana at MADE (I showed those and my Recycled Bunny Peeps to you yesterday) that I set out to make a Chick. It took some scibbled out drawing attempts to do it, but I got a Chick pattern I loved! 


I only had sheets of felt - nothing by the yard.  You can only squeeze on 4 chicks per sheet.  You will get two chick facing right, two facing left. 

Cut out the chicks, and use the template to help guide you where the eye, mouth and belly line belong.


Then display your Chick Peeps everywhere!


To get the original Chick pattern click here. They are SO stinkin' cute.  I cannot wait to go get more felt tomorrow to do some in other colors!

If you make any, send me the pictures I'd love to see them! SandyToesBride@gmail.com  Can't wait to see what you do! If you also link up this post, please just let me know!  Thanks!

Monday, March 28, 2011

Monday Funday PEEPS!

Everyone loves Peeps.  Even people who don't like candy still like Peeps.   They have been popping up everywhere in the crafty blog world.  I was certainly inspired and took a few ideas, added my own twist and here it is:

Peeps and Carrot Bunting!!!!  I LOVE IT LOVE IT LOVE.  I got the Peeps idea from here.  The site is great and offers a ton of ideas.  The carrots came from here, again another ammmmmazing site.  I made the peeps smaller than the tutorial - but that's what I preferred. 


I got an ingenious idea to make an OUTDOOR version using all found items in the house!! YAY ME!

Supplies:
Cereal box or other thin cardboard box.
Yellow shopping bags
craft glue
ribbon
sharpie marker
Peep template

Making the template was the hardest part.  If I can get google docs to work, I'll upload one in a bit. Take the cereal box and cut it open.  You can get two large size bunnies from one box.

Template and bunny.
I had two cereal boxes, so I was able to cut 4 bunnies.
I took the plastic bag and cut open, cut off the handles and laid it flat.
 Originally, I did not paint the bunny yellow - but when he dried all the way, he was not as "yellow" as I could have liked, so I got out some paint and went to town painting a thin coat on the bunnies.

YELLOW BUNNIES!
Take the cut plastic bag, apply a line of glue to the outer edge  of the YELLOW side of the bunny (face) and place it face-down on the yellow bag.  Cut around the outside to make 'flaps' that you will glue up around the back (not yellow) side.
Apply a thin layer of glue to the back of the bunny along the outside.  Smooth it out with your finger.  then begin folding the flap in.  The plastic is very flex able and LOVES the glue.  You will be able to smoosh the flaps around a bit to make sure you have a tight seal from the front to back.
If you do get a section that has no available cardboard to glue to, apply a tiny bit of glue to the plastic then push it up onto the other plastic/cardboard.  It will stick. 
Back of the covered bunny. I overlapped strips to make sure the entire back was covered in plastic, but I forgot a picture.  I put all four bunnies aside to dry overnight (there was a ton of glue on them.)
I cut 18" strips of random ribbon I had and glued them to the back of the bunnies - one by the ears, one by the bottom.  (you can see how the back is also covered here) I turned them over and used the sharpie to draw on the eyes and nose. 

I took my four bunnies and tied them to the posts on my porch. 


Ta-Da!!  Recycled Peep Bunnies!!!!
If you have any questions about the tutorial don't hesitate to email me!  Sandytoesbride@gmail.com  I'd love to see any photos of the ones you make!

All photos are personal.

I'll also post the tutorial for the wreath later this week. :-)


Saturday, March 26, 2011

WhoopdWhoop

Hey hey!  Hope everyone is having a fabulous weekend!  Just wanted to share a great new site I stumbled upon.  It's called WhoopdWhoop.  The site allows you to post items you have created and "swap" them currency free with other crafters.  You earn Whoops for each item you "sell" and then you can purchase items with your Whoops the only cost is the shipping of the item.  Amazing.  I am so excited and cannot wait to get my shop up and running so I can start buying things from other crafters! YAY!

You can join by clicking on my refferal link: http://bit.ly/edTRHg  That will take you right to the site to join and help me out in the process!!  You can also click on the right on the widget and that will also take you to the site too.  Thanks!!!! :-) 

Friday, March 25, 2011

Fighting Fonts

I'm sure you're not surprised to find out I want to DIY our invitation suite.  MOH N and I were at a bridal expo and I fell in LOVE with these beautiful pocket fold style invites in a light blue with starfish illustrations on the card and a tiny starfish on the band.... *sigh* ....until I asked how much they were.  The lady smiled and kindly told me TWELVE DOLLARS an invitation.  Exxxxcuse me?!?


                                                             Seriously, this was my face...

Once I picked my jaw up off the floor, I realized I could probably make them.  The wheels started turning.  I went home and began researching pocket fold invitations in a beach theme:

                                                      Source Etsy seller moonlightstamper
Very pretty, but still out of budget at $7.00+ for all the pieces we would need.  Not gonna be able to do it.

                                                             Swoon over the details.
HAHAHAHAHA.  Aaaaamazing pieces of stationary, but again - way out of budget. Great inspiring ideas, fantastic quality, but not feasible.


This was more of what we were looking for, but again, no price listed means too expensive. 

So I started fooling around with Microsoft Word and came up with something that wasn't too shabby.  Mr. ST was mildly impressed and encouraged me to keep working on it.  We (and really, it was BOTH of us) began placing calls and finding out what the total cost would be for us to make these delightful stationary bundles.  We ran the numbers several times - a shocking $4.00 wiiiith postage.  Um, hello, YES!!!!
                                                                           Source

So I've been fiddling around on Microsoft Word, Powerpoint and Publisher for the last three months trying to get some graphics/illustrations that I can live with.  I thiiiiink I may have finally done it.  I downloaded a great font from DaFont.com.  I very proudly show it to Mr. ST last night.....

The darling Mr. ST Groomzilla doesn't like the way his name looks in the two fonts I gave him to choose from.  Exxxxxxcuse meeeeeee!?!?!?!  I have busted my butt making a mock-up for him and he doesn't like the font???  Then he tells me he doesn't like the traditional wording I picked.  Why can't I put our names up at the top? He says we're the important ones and should be at the top and first. 

                                                                  I was ANGRY
At his point my head spun around on my neck all Exorcist-style, I shoved the laptop off my lap, huffed and puffed at him about how much time I've spent doing these invitations, stormed into the bedroom and shut the door. 

After I calmed down, I realized that (I was right to be mad) and that maybe Groomzilla had a small point - we could be first.  I'm bucking against tradition in several aspects of the day, why can't our invitations follow along?

He sent me an email today with several of the fonts that he likes with the message.  "I hope I picked a font on here that you like too.  Don't be angry with anything I chose.  Love you very much."
Haha.  At least he is willing to help in the process now. 

Did you have invitation frustration?  Was it easy for you to find something in your budget?  Am I the only bride whose Groom has an opinion on every detail?????

Monday, March 21, 2011

Monday Funday CAKES!

I love to bake.  I love to cook.  I'm rather good at both.  Cake/cupcakes are valuable bribery for most people and especially for high school students.  I started baking cupcakes as rewards for exemplary things last year and of course would share with some of my other teacher friends.  They were always a hit, so I started getting orders.  Cakes are also a specialty of my grandmother and I have almost all her pans now. She would make a themed cake for EVERY birthday/event when we were growning up.  It's an inherited skill. 

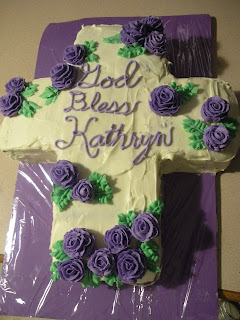
For today's Monday Funday - The Confirmation Cake:

I made home-made Chocolate cake and filled my 10x15 pan. 

Then I made the CREAM CHEEEEEEEESE Frosting - soooo yummy.
 I cover an old box part to make the platform for the cake.
 I hand piped out 24 Butter Cream roses.
 Once the cake is cooled and "partially frozen/refrigerated" I carve it into the proper shape. For this cake, a cross.
 The cake is covered in a thin layer of frosting to prevent crumbs getting everywhere then covered again in the Cream Cheese Frooooosting to be nice and thick.
 Roses are placed on the cake and Butter Cream leaves are piped on.
 I piped on a star border to make it look pretty.

 YUMMY ROSES!!!!!
 The best part of making home-made cake mix is that there are sometimes leftover mix - so Mr. ST gets cupcakes. 

 I used the left over roses to decorate his cupcakes. 
 SO PRETTY.  Annnnnd I also fill the cupcakes with frosting - because they need to be better than the average cupcake.
 This Thomas the Train Cake was made for the same family a while back - didn't take any pictures other than the finished project. All carved by hand and hand iced.  PHEW! It was a bit time consuming.
 And I do NOT use fondant - yuck. 

Well I hope everyone had a FABULOUS weekend!!!  I had an amazing time with some amazing girls this weekend.  Have you ever made a designer cake?  Have you taken the classes? I want to, but I'm not sure I'll learn anything.  Are they worth it?

Saturday, March 19, 2011

Bridesmaid Cards

Drum roll pleassssse! The Bridesmaid Card post is without further ado here!
                                                                            Source

 
I knew I wanted to give the girls a card when I asked them to be part of the wedding.  I had lofty ideas of making them jewelry also, but that got nixed when I realized I was not going to be able to contain myself and had to begin asking my friends. 

I went straight to the Cricut to make these cards.  I knew they would be special mementos and that cutting elements out with the Cricut would make them perfect. 
I started with the Cape Cod paper collection - it's beach-y colors.  It was also the closest to teal I could find in a pack.  Oh well.  I used the cream for the envelope, the darkest blue for the card base and the other three colors for the extras.  I also needed purple, but I had that in my stash.


I used the Life's a Beach, Tie the Knot, and Wild Card cartridges.  LOVE THEM.  Life' a Beach is certainly my favorite.

The rest of the supplies - paper cutter, scissors, and the Xyron sticker maker (a MUST HAVE)
I cut the envelope at fit to page size. 


Then did the same with the card.


I typed the saying up in Word.  I used the definition of a Friend, but I also added special elements for each girl - so number 4 might have said Goes on vacations with you or Leaves love plants for boys with you - you get it.  Number 6 was cut separate to be put on the inside with the question: will you be my bridesmaid (or matron of honor).


I ran EVERYTHING through the Xyron to make it a sticker. 


Placed the definition on the front with some shells - looks pretty inconspicuous. 


Then on the inside added number 6 and the question.  I also put a dress - nothing like what they will wear, but still - bridesmaids and dresses go hand in hand. 


I decorated each envelope with a shell and their first initial. 

It was not as time consuming as I thought it would be.  I didn't make all 7 at the same time though.  I've done one here and one there.  It was lovely and sweet.  I love watching the girls read the outside - they start to look at me funny - thinking, why am I getting a card like this, then they read the inside and everyone starts screaming. 

Did you make cards?  Did you do something special for your bridesmaids when you asked them?